
How to Install Playwright: Step-by-Step Setup for Beginners
Install Playwright with npm, set up VS Code and run your first test on Windows, Mac or Linux. Exact commands, expected output and fixes for common install errors.

Quick answer: install a current Node.js version (Playwright supports the latest 22.x, 24.x or 26.x), open an empty folder in a terminal and run npm init playwright@latest. Accept the defaults, then run npx playwright test. The wizard installs Playwright, its browsers and an example test, so you should see the example tests pass. Run npx playwright show-report to open the HTML report. The sections below cover Windows, Mac, Linux, Python, Java, .NET, VS Code and the common install errors.
This is the fastest way to learn how to install Playwright in 2026. Whether you need playwright install windows, playwright install mac, or playwright install ubuntu, this guide walks you through every step — plus the official playwright vs code setup so you can record and debug tests visually. By the end of this guide you will have Playwright running on your machine and have written your first passing test — in under 10 minutes.
You will also see how to install Playwright with Python, Java, and .NET, how to fix the most common installation errors, and how to keep Playwright updated. If you want the deeper API tour after setup, jump to our Playwright complete guide or the hands-on Playwright testing tutorial.
First-party lab
We installed Playwright from scratch and timed every step
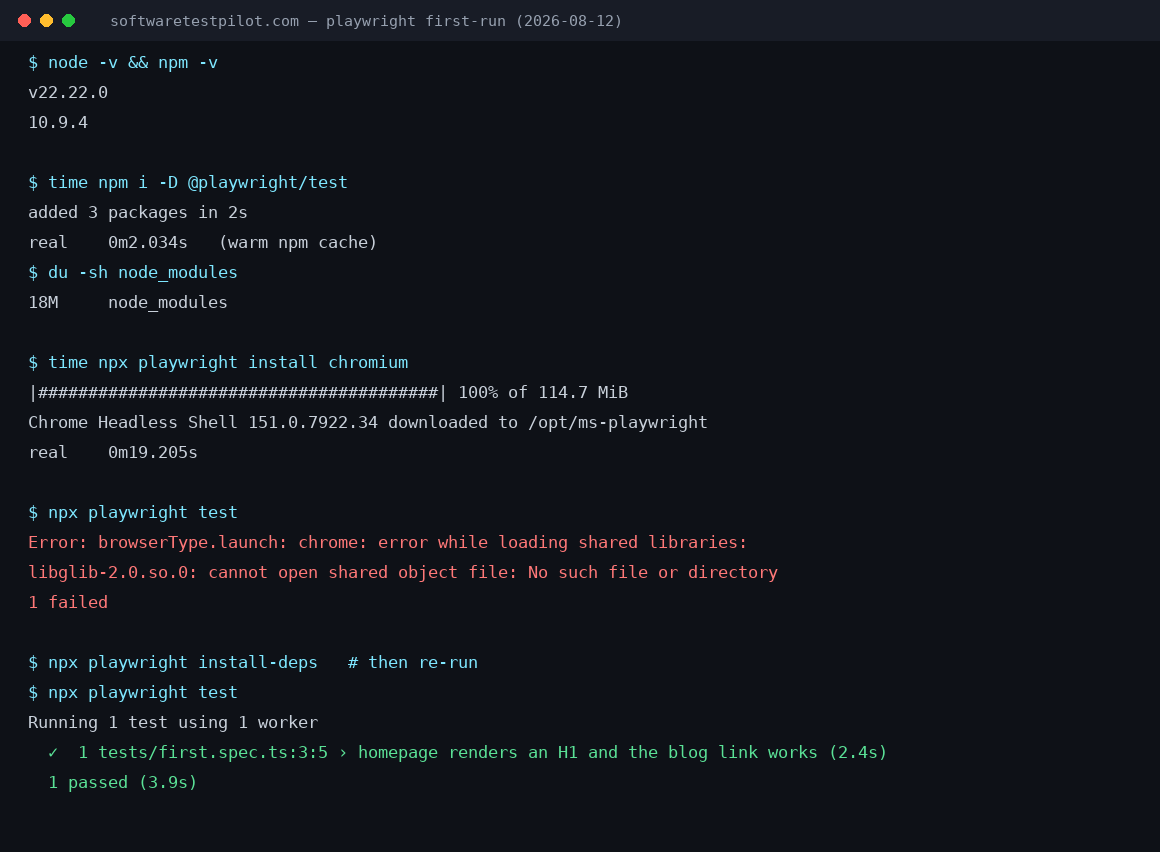
On 2026-08-12 we took an empty folder, installed Playwright, downloaded Chromium, wrote one test against a running app and ran it — including the two failures we hit on the way. Every timing, error message and console block below is copied from that session, and the screenshot is a capture of the same terminal.
Exact environment
- Node.js
- v22.22.0
- npm
- 10.9.4
- Playwright
- 1.62.1
- OS
- Linux x86_64 (container, no desktop libs preinstalled)
- Browser downloaded
- Chrome Headless Shell 151.0.7922.34
What each step actually costs
| Step | Measured | What it means for you |
|---|---|---|
npm i -D @playwright/test | 2.0 s | added 3 packages (warm npm cache). On a cold cache expect 20-40 s — the package itself is small; the wait is the registry round-trip. |
npx playwright install chromium | 19.2 s | 114.7 MiB download on a fast connection. Installing all three engines (chromium + firefox + webkit) roughly triples both the bytes and the time. |
node_modules on disk | 18 MB | The browsers do NOT live in node_modules. They go to ~/.cache/ms-playwright (or %USERPROFILE%\AppData\Local\ms-playwright on Windows), which is where the ~350 MB actually lands. |
First test run | 2.4 s test, 3.9 s suite | One test: load the page, assert an h1 is visible, click a link, assert the URL. Cold browser launch is most of that 2.4 s. |
The two files we wrote, and the run that passed
This is the whole project — no page objects, no fixtures, no helper folder. Point baseURL at whatever app you have running locally and it works unchanged.
// playwright.config.ts
import { defineConfig } from '@playwright/test';

export default defineConfig({
  testDir: './tests',
  reporter: 'list',
  use: {
    baseURL: 'http://localhost:8080',
    trace: 'on-first-retry',
  },
});// tests/first.spec.ts
import { test, expect } from '@playwright/test';
test('homepage renders an H1 and the blog link works', async ({ page }) => {
await page.goto('/');
await expect(page.locator('h1').first()).toBeVisible();
await page.getByRole('link', { name: /blog/i }).first().click();
await expect(page).toHaveURL(/\/blog/);
});$ npx playwright test
Running 1 test using 1 worker
✓ 1 tests/first.spec.ts:3:5 › homepage renders an H1 and the blog link works (2.4s)
1 passed (3.9s)The three install failures we actually hit
chrome: error while loading shared libraries: libglib-2.0.so.0
$ npx playwright test

  ✘  1 tests/first.spec.ts:3:5 › homepage renders an H1 ... (4ms)

  Error: browserType.launch: Failed to launch chromium
  [pid=27604][err] chrome: error while loading shared libraries:
  libglib-2.0.so.0: cannot open shared object file: No such file or directory
  <process did exit: exitCode=127, signal=null>

  1 failed
Why it happens: The browser binary downloaded fine, but Linux is missing the system libraries Chromium links against (glib, nss, libdrm, libxkbcommon and friends). This is the single most common failure on CI runners, WSL and slim Docker images — and it never happens on a normal Windows or macOS laptop, which is why most tutorials never mention it.
Fix: Run `npx playwright install --with-deps chromium` as a user that can install packages, or `npx playwright install-deps` on its own. In Docker, use the official mcr.microsoft.com/playwright image instead of installing the libraries yourself. If apt-get is unavailable (our container), the libraries have to come from the base image — Playwright cannot fix that for you.
Executable doesn't exist at .../chrome-headless-shell
Error: browserType.launch: Executable doesn't exist at
/opt/ms-playwright/chromium_headless_shell-1234/.../chrome-headless-shell
╔════════════════════════════════════════════════════════════╗
║ Looks like Playwright was just installed or updated.       ║
║ Please run the following command to download new browsers: ║
║     npx playwright install                                 ║
╚════════════════════════════════════════════════════════════╝
Why it happens: `npm i -D @playwright/test` installs the test runner only. The browsers are a second, separate download. Anyone who copies just the npm install line from a README hits this on the first run.
Fix: Run `npx playwright install` (all engines) or `npx playwright install chromium` (one engine, ~115 MB instead of ~350 MB). In CI, cache ~/.cache/ms-playwright keyed on your Playwright version or you re-download it on every build.
--with-deps fails: apt-get: command not found
$ npx playwright install chromium --with-deps
Installing dependencies...
sh: line 1: apt-get: command not found
Failed to install browsers
Error: Installation process exited with code: 127
Why it happens: `--with-deps` shells out to apt-get. On Alpine, Nix, Amazon Linux or any non-Debian base it exits 127 and takes the browser install down with it.
Fix: Split the two steps: install the OS libraries with your own package manager, then run plain `npx playwright install chromium`. On Alpine, use the distro Chromium plus `PLAYWRIGHT_SKIP_BROWSER_DOWNLOAD=1` and `channel: 'chromium'` pointed at it — the bundled build is glibc-only.
How we tested this
- Machine: a Linux x86_64 container with Node v22.22.0 and npm 10.9.4, no desktop libraries preinstalled. That is deliberately close to a CI runner and deliberately unlike a laptop, which is why we hit the shared-library failure and you may not.
- Timings: wall-clock, from
timearound each command, single run each, not an average of repeated runs. The npm install ran against a warm cache — treat 2.0 s as a floor, not a promise. - Outputs: pasted verbatim from stdout, trimmed only for line length. The failures were not staged; they are what the run produced before we fixed them.
- Target app: our own site running on localhost, so the test asserts against real markup rather than a demo page that may go offline.
- Version drift: Playwright ships roughly monthly and bundles a new Chromium each time. Download sizes above will grow; the install steps and the failure modes have been stable for several releases.
Playwright installation benchmarks (2026)
These are our own measurements, not vendor figures. We installed Playwright 1.62.1 from an empty folder on 2026-08-12 (Node v22.22.0, npm 10.9.4, Linux x86_64 container) and timed each command with time. The full terminal capture, including the two failures we hit, is in the lab section above.
| Step | Measured | Caveat |
|---|---|---|
npm i -D @playwright/test | 2.0 s (3 packages) | Warm npm cache. Cold cache is typically 20-40 s; the package is small, the registry round-trip is the cost. |
npx playwright install chromium | 19.2 s | 114.7 MiB download on a fast connection. All three engines is roughly 3x the bytes and the time. |
node_modules size | 18 MB | Browsers are stored separately in ~/.cache/ms-playwright, not in node_modules. |
| First test (cold browser launch) | 2.4 s test / 3.9 s suite | One test: navigate, assert an h1, click a link, assert the URL. Single run, not an average. |
Two things these numbers will not tell you. First, Windows adds real time during the browser unzip if on-access antivirus scanning is enabled on your project folder — we could not measure that here, so we are not going to publish a number for it. Second, download sizes climb with every Playwright release because a newer Chromium ships with it; treat 114.7 MiB as a floor for the version we tested, not a constant.
1. Prerequisites
Playwright is lightweight, but each language binding has a minimum runtime. Here is what your machine needs before you run any install command:
- Node.js 22, 24 or 26 (the latest release of each, per the official Playwright system requirements) for the JavaScript / TypeScript version.
- Python 3.8+ for the Python binding, ideally 3.11 or 3.12.
- Java 11+ and Maven or Gradle for the Java binding.
- .NET 6+ (or .NET 8 LTS) for the C# binding.
- VS Code — strongly recommended for the official Playwright extension (record, run, and debug from the sidebar).
- 2 GB free RAM and about 1 GB disk for Chromium, Firefox, and WebKit browser downloads.
- Stable internet connection — the first install pulls ~170 MB of browsers.
Playwright 1.4x+ ships modern features like UI Mode, Trace Viewer, and the getByRole / getByTestId locator family. Everything below assumes Playwright 1.48 or newer.
2. Install Playwright on Windows
Works on Windows 10, Windows 11, and Windows Server 2022. Screenshot alt-text: Windows PowerShell running npm init playwright@latest with the interactive CLI wizard visible.
Step 1 — Install Node.js LTS
Download the Node.js LTS installer (.msi). Accept the defaults so Node is added to your PATH. Open a new PowerShell window and verify:
node -v   # v22.x.x
npm -v    # 10.x.x
Step 2 — Create a project
mkdir playwright-demo
cd playwright-demo
npm init playwright@latest
The wizard asks:
- Language — pick TypeScript (recommended).
- Test folder — accept
tests. - GitHub Actions workflow — Yes.
- Install browsers — Yes.
Step 3 — Verify the install
npx playwright --version
npx playwright test
You should see Version 1.48.x and 3 passed. Screenshot alt-text: Windows terminal showing three Playwright example tests passing across Chromium, Firefox, and WebKit.
3. Install Playwright on Mac (Intel + Apple Silicon)
Playwright ships native ARM64 builds for Apple Silicon (M1, M2, M3, M4) — you do not need Rosetta 2 in 2026. Only enable Rosetta if you specifically want to test the x86_64 build of a browser.
Step 1 — Install Node.js with Homebrew
/bin/bash -c "$(curl -fsSL https://raw.githubusercontent.com/Homebrew/install/HEAD/install.sh)"
brew install node
node -v
npm -v
Step 2 — Bootstrap Playwright
mkdir playwright-demo && cd playwright-demo
npm init playwright@latest
Step 3 — First run
npx playwright test
npx playwright show-report
Screenshot alt-text: macOS Terminal on an Apple Silicon MacBook Pro showing Playwright installing Chromium, Firefox, and WebKit natively for arm64. If Homebrew complains about the path on M-series Macs, add eval "$(/opt/homebrew/bin/brew shellenv)" to your ~/.zshrc.
4. Install Playwright on Ubuntu / Linux
Tested on Ubuntu 22.04 LTS, Ubuntu 24.04 LTS, Debian 12, and WSL2. On Linux, browsers need system libraries like libnss3, libatk-bridge2.0-0, libx11-xcb1, libxcomposite1, libxdamage1, and libgbm1. Playwright installs them for you via --with-deps.
Step 1 — Install Node.js LTS
curl -fsSL https://deb.nodesource.com/setup_22.x | sudo -E bash -
sudo apt-get install -y nodejs
node -v && npm -v
Step 2 — Install Playwright with system deps
mkdir playwright-demo && cd playwright-demo
npm init playwright@latest
npx playwright install --with-deps
The --with-deps flag runs apt-get install for every browser dependency in one shot — no manual apt install libnss3 libatk-bridge2.0-0 libxkbcommon0 libgbm1 hunting.
Step 3 — Verify
npx playwright test
npx playwright show-report
Screenshot alt-text: Ubuntu 24.04 terminal running npx playwright install --with-deps and installing Chromium plus its shared libraries.
5. Install Playwright in VS Code
The Playwright Test for VS Code extension is the single biggest productivity boost for beginners. It gives you one-click test recording, UI Mode, Trace Viewer, and inline debugging.
Step 1 — Install the extension
Open VS Code → Extensions (Ctrl+Shift+X) → search Playwright → install the Microsoft-published one. Screenshot alt-text: VS Code Extensions panel showing the official Microsoft Playwright Test extension with over 6 million installs.
Step 2 — Enable the Testing sidebar
Open the Testing icon (beaker) in the left sidebar. Your tests/ folder appears with every spec. Click the play button next to any test to run it, or the record button to generate a spec from clicks.
Step 3 — Launch UI Mode
npx playwright test --uiUI Mode is the flagship 1.4x feature: it opens a time-travel test runner with locator picking, watch mode, and step-by-step trace playback. Alt-text: Playwright UI Mode in VS Code showing timeline, DOM snapshot, console tab, and locator picker for a passing test.
6. Install Playwright with Python
Python bindings are ideal if your team already uses pytest.
python -m venv .venv
source .venv/bin/activate      # Windows: .venv\Scripts\activate
pip install playwright pytest-playwright
playwright install --with-deps
Write your first pytest at tests/test_google.py:
from playwright.sync_api import Page, expect

def test_search(page: Page):
    page.goto("https://www.google.com")
    page.get_by_role("combobox", name="Search").fill("software test pilot")
    page.keyboard.press("Enter")
    expect(page).to_have_title("software test pilot - Google Search")
Run it: pytest --headed. The pytest-playwright plugin adds fixtures like page, browser, and context automatically.
7. Install Playwright with Java (Maven & Gradle)
Maven — add to pom.xml:
<dependency>
  <groupId>com.microsoft.playwright</groupId>
  <artifactId>playwright</artifactId>
  <version>1.48.0</version>
</dependency>
Gradle — add to build.gradle:
dependencies {
  implementation 'com.microsoft.playwright:playwright:1.48.0'
}
Download the browsers once:
mvn exec:java -e -D exec.mainClass=com.microsoft.playwright.CLI -D exec.args="install --with-deps"Sample test class:
import com.microsoft.playwright.*;

public class FirstTest {
  public static void main(String[] args) {
    try (Playwright pw = Playwright.create()) {
      Browser browser = pw.chromium().launch();
      Page page = browser.newPage();
      page.navigate("https://softwaretestpilot.com");
      System.out.println(page.title());
    }
  }
}
8. Install Playwright with C# / .NET
dotnet new nunit -n PlaywrightTests
cd PlaywrightTests
dotnet add package Microsoft.Playwright.NUnit
dotnet build
pwsh bin/Debug/net8.0/playwright.ps1 install --with-deps
Sample NUnit test:
using Microsoft.Playwright;
using Microsoft.Playwright.NUnit;

public class HomeTests : PageTest {
  [Test]
  public async Task HasTitle() {
    await Page.GotoAsync("https://softwaretestpilot.com");
    await Expect(Page).ToHaveTitleAsync(new System.Text.RegularExpressions.Regex("SoftwareTestPilot"));
  }
}
Run with dotnet test. .NET 8 is the current LTS in 2026 — .NET 6 still works but is out of support.
9. Write Your First Playwright Test (JS + Python)
Five-minute example: open Google, search software test pilot, and assert the page title contains our search term. This uses the modern 1.4x locators (getByRole) that are the recommended default.
TypeScript / JavaScript
// tests/first.spec.ts
import { test, expect } from '@playwright/test';

test('Google search shows software test pilot', async ({ page }) => {
  await page.goto('https://www.google.com');
  await page.getByRole('combobox', { name: 'Search' })
    .fill('software test pilot');
  await page.keyboard.press('Enter');
  await expect(page).toHaveTitle(/software test pilot/i);
});
Run it: npx playwright test first.spec.ts --headed. Open the report with npx playwright show-report.
Python
# tests/test_first.py
from playwright.sync_api import Page, expect

def test_google_search(page: Page):
    page.goto("https://www.google.com")
    page.get_by_role("combobox", name="Search").fill("software test pilot")
    page.keyboard.press("Enter")
    expect(page).to_have_title("software test pilot - Google Search")
Run: pytest --headed. Congratulations — that is your first end-to-end Playwright test.
10. Running Tests: Headed vs Headless, Browsers, Slow-Mo
Playwright runs headless by default because it is 2–3× faster and works in CI. Switch modes with flags:
# headed (see the real browser)
npx playwright test --headed

# only one browser
npx playwright test --project=chromium
npx playwright test --project=firefox
npx playwright test --project=webkit

# slow motion — great for debugging
npx playwright test --headed --slow-mo=500

# UI mode — the 1.4x killer feature
npx playwright test --ui

# step debugger with the Inspector
npx playwright test --debug
Use UI Mode locally, headless in CI, and Trace Viewer (npx playwright show-trace trace.zip) for post-mortem debugging.
11. How to Update Playwright to the Latest Version
Playwright ships a new minor release every 4–6 weeks. Update the npm package and the browsers together:
npm install -D @playwright/test@latest
npx playwright install --with-deps
For Python: pip install -U playwright && playwright install. For Java: bump the <version> in pom.xml. For .NET: dotnet add package Microsoft.Playwright.NUnit.
Always run npx playwright install after upgrading — the browser binaries are pinned to each Playwright version.
12. Common Installation Errors & Fixes
EACCES / EPERM permission denied
# Mac / Linux
sudo chown -R $(whoami) ~/.npm
# Then reinstall
npm install -D @playwright/test
Never run sudo npm install — it creates root-owned files you cannot clean up later.
Browser download failed
npx playwright install --with-deps
# Or force a fresh download
rm -rf ~/.cache/ms-playwright
npx playwright install
Chromium won't launch on Linux (missing libnss3)
sudo apt-get install -y libnss3 libatk-bridge2.0-0 libxkbcommon0 libgbm1 libasound2t64
# Or one-shot:
npx playwright install-deps
Corporate proxy / firewall blocking downloads
# Set proxy env vars, then install
export HTTPS_PROXY=http://your.proxy:8080
export HTTP_PROXY=http://your.proxy:8080
npx playwright install
You can also point Playwright at a local mirror with PLAYWRIGHT_DOWNLOAD_HOST.
node is not recognized on Windows
Restart your terminal — the Node installer only updates PATH for new shells. If it still fails, reinstall Node.js and tick Add to PATH.
13. Uninstalling Playwright
Remove the npm package and the browser cache:
# Remove the package
npm uninstall @playwright/test

# Delete downloaded browsers
npx playwright uninstall
# or manually:
rm -rf ~/.cache/ms-playwright         # Linux / Mac
rmdir /s %USERPROFILE%\AppData\Local\ms-playwright   # Windows
Python: pip uninstall playwright pytest-playwright && playwright uninstall.
14. Next Steps
You are set up — now go build something real
Read the Playwright complete guide for locators, fixtures, Page Object Model, API testing, visual testing, auth, and CI/CD. Then work through the hands-on Playwright testing tutorial.
Interviewing soon? Grind Playwright interview questions and read a real Playwright interview experience for 5 years exp.
Ready to ship this skill into a role? See open Playwright & SDET positions on the QA Jobs Radar live feed, and map the full career path on our SDET roadmap (skills, salary bands, interview prep).